This website in which I bring knowledgeable Tips, hacking, games, and crack software and tips and tricks computer. Internet related information and methods of Make Money online are available from which you can read in Hindi. The main purpose of this website which we get in software money, we can crack easily and use it for free.

How to Create a Google+ Business Page in 5 Simple Steps

How to Create a Google+ Business Page in 5 Simple Steps


1. Choose an Accessible Gmail Account

If we learned anything from creating our own account, it's that Google+ Pages' administrative capabilities could use improvement. Avoid creating your business page through just any old account, such as a personal gmail account. Instead, choose a gmail account that is accessible to multiple members of your marketing team (e.g. companymarketingteam@gmail.com), and use that account to create your page. Because Google+ Pages' administrative capabilities currently don't seem to be as sophisticated as Facebook's (which enable you to assign multiple page admins regardless of the page's origins), you'll want to choose a host account that makes your page as accessible to multiple contributors as possible.
Note: Because of overwhelming user feedback, the 'Google+ Your Business' Google+ Page (confused yet?) has indicated that Google+ has already started working on multi-admin support and ownership transfer, which will be available in the coming weeks/months. For now, we recommend making your account as accessible to other team members as possible.

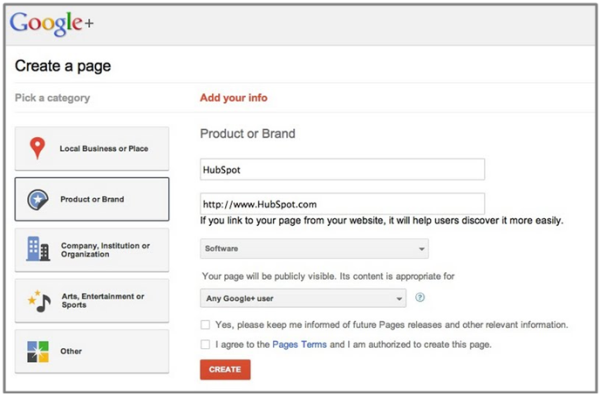
2. Create a Page with the Desired Account

Visit http://plus.google.com/pages/create, and if you see the option to create a Google+ Page, get started! Follow the wizard (it's much like Facebook's Page wizard), and choose the most appropriate option to classify your business. You'll be able to select from the following options:
  • Local Business or Place
  • Product or Brand
  • Company, Institution or Organization
  • Arts, Entertainment or Sports
  • Other
After selecting your classification, fill in your basic information, including your page name (i.e. your company name), your business' website URL, your category (i.e. your industry), and the classification of your page's content (i.e. any Google+ user, 18 years of age or older, etc.).
describe the image

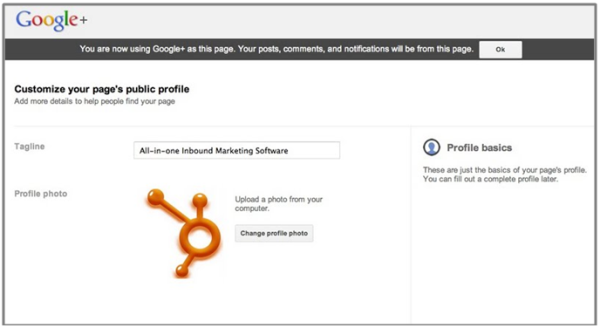
3. Customize Your Public Profile

The third step involves customizing your public profile. The profile basics include your tagline (think of it as your business' elevator pitch) and an image (your company logo is a great option).
describe the image

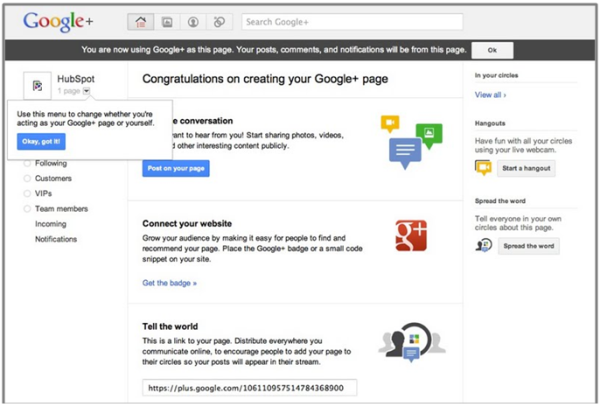
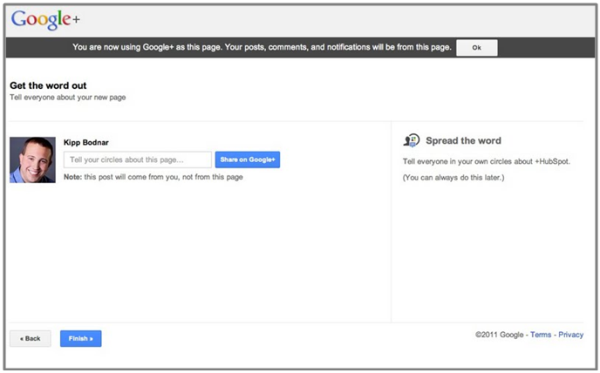
4. Promote Your Page

At this point, you've created the skeleton of your page, and Google+ will now prompt you to promote your page. Our recommendation is to customize your page even further and start sharing a few updates before you begin telling the world about it. Promoting a blank page isn't a great way to convince people that your Page is valuable enough to add to their Circles. So invest some time into optimizing your page and sharing a few links to valuable content before you start promoting it to the masses.
google step4 resized 600

5. Get Going!

At the most basic level, this is really all you need to do to get your page launched. But as any smart marketers know, the 'basics' aren't usually enough. Intelligent marketers understand the importance of optimizing their page to make it not only more engaging, but also more valuable and effective for lead generation. In this step, follow Google+'s prompts to create an effective page, and remember -- Google+ is a social network. Although every social network has its specific nuances and behaviors, many of the same best practices will still apply. Regularly share fresh content, react and respond to your fans, be engaging, and optimize for lead generation. Then measure, adapt your strategy, and optimize your presence based on your own individual results and goals.
google step5 resized 600

How To Add Contact Form (Contact Us Page) in Blogger?

How To Add Contact Form (Contact Us Page) in Blogger?

Adding a contact us form in Blogger is a tedious task as it does not support plugins like WordPress.
What most of the Blogspot bloggers does is to seek the help of third-party sites (foxyform, jotform, 123contactform, etc.).
But today, you are going to learn how to add official contact us page in Blogger.
As I said earlier, it is possible to get third-party codes to be inserted in new pages like a walk in the park. Yet, the official contact form is far better than those.

The Benefits of Official Blogger Form

  1. You will get the message as soon as one sends it. And, the deliverability is 100% as well.
  2. The simple interface makes it easy for the visitors to contact you.
  3. If you know Cascade Style Sheet (CSS) language, it will be easy for you to customize the form as per your liking.
  4. The entire page will not get reloaded for sending the message.
I have divided this tutorial into three sections, adding the contact gadget, hiding it and implementing the official code in a new page.

Part – 1: Adding the Contact Gadget

Follow the steps given below to add a contact us gadget on your blog.
Step 1: Visit blogger.com and log in to your account. If you are running multiple blogs, you need to choose the desired blog from the list.
Step 2: Click on Layout from the left sidebar to get an option to add gadgets.
blogger layout option
Step 3: You can see an Add a Gadget link on the main panel on the right side. Clicking on it will bring you to a list of gadgets.
blogger add a gadget
Step 4: Then, choose More gadgets from the left side. Now, you will see Contact Form. Just add the same.
Contact Form Gadget Blogger

Part – 2: Hiding the Gadget

Now, you are going to learn how to hide the contact gadget.
Step 1: We need to play with the template section here. So, click on Templates from the left menu.
Blogger Template Settings
Step 2: Then, click on Edit HTML and you will be provided with the whole code of your blog in a large field.
Blogger Template Edit HTML
Step 3: Search for ]]></b:skin> and place the following code just before it.
div#ContactForm1 {
display: none !important;
}
Contact Form Code Blogger
Then, click Save to retain the changes.
After the third step, you will not see Contact widget on your blog.

Part – 3: Adding Contact Form to a Page

You will get the customized official blogger contact form code here to be added to be shown on a separate page.
Step 1: Go to Pages and click on New page.
New Page in Blogger
Step 2: Paste the following code into the HTML post editor after removing everything in it.
Blogger Contact Us Page Code
<div id="custom_ContactForm1" class="widget ContactForm">
<div class="contact-form-widget">
<p>Get in touch with us by filling out the form below.</p>
<div class="form">
<form name="contact-form">
<p></p>
Name
<br>
<input type="text" value="" size="30" name="name" id="ContactForm1_contact-form-name" class="contact-form-name">
<p></p>
Email
<span style="font-weight: bolder;">*</span>
<br>
<input type="text" value="" size="30" name="email" id="ContactForm1_contact-form-email" class="contact-form-email">
<p></p>
Message
<span style="font-weight: bolder;">*</span>
<br>
<textarea rows="5" name="email-message" id="ContactForm1_contact-form-email-message" cols="25" class="contact-form-email-message"></textarea>
<p></p>
<input type="button" value="Send" id="ContactForm1_contact-form-submit" class="contact-form-button contact-form-button-submit">
<p></p>
<div style="text-align: center; max-width: 222px; width: 100%">
<p id="ContactForm1_contact-form-error-message" class="contact-form-error-message"></p>
<p id="ContactForm1_contact-form-success-message" class="contact-form-success-message"></p>
</div>
</form>
</div>
</div>
<div class="clear"></div>
<span class="widget-item-control">
<span class="item-control blog-admin">
<a title="Edit" target="configContactForm1" onclick="return _WidgetManager._PopupConfig(document.getElementById("ContactForm1"));" href="//www.blogger.com/rearrange?blogID=8799058979810298021&widgetType=ContactForm&widgetId=ContactForm1&action=editWidget&sectionId=sidebar-right-1" class="quickedit">
<img width="18" height="18" src="//img1.blogblog.com/img/icon18_wrench_allbkg.png" alt="">
</a>
</span>
</span>
<div class="clear"></div>
</div>
Step 3: Add a title (like Contact Us) and then change the settings given right as given below.
Contact Us Page Blogger
Step 4: Finally, click the Publish button. That’s all.
The messages send from this contact form will be delivered to the admin email. If the blog has more than one admin, all of them will get it.
Also Read:

Wrapping Up

I hope you now know how to add contact us page in blogger. If you find any difficulty like zero deliverability even after success message, I recommend reinstalling the Contact widget.
And yeah, if you have ample knowledge in dealing with CSS and javascript snippets, you can go on customizing the page for a better visual appeal.
Don’t forget to share this post with your blogger friends. ðŸ™‚

REQUEST HERE

Blogger Tips and TricksLatest Tips And TricksBlogger Tricks

Popular Posts