This website in which I bring knowledgeable Tips, hacking, games, and crack software and tips and tricks computer. Internet related information and methods of Make Money online are available from which you can read in Hindi. The main purpose of this website which we get in software money, we can crack easily and use it for free.

Showing posts with label Business. Show all posts

Ultimate Label Widget Designs for Blogger Blogs


Label widget is one way to show categories of our posts, it has been installed by blogger with the default simple design, Label widgets may be configured as Cloud, list, alphabetically, or by frequency but the best custom is the cloud to limit that space need for the widget, on my previous posts i have shared Animated 3D like Labels and Label with Matrix Effects


Today I am going to share multiple style for my readers please feel free to install it in your blogs"
Steps1: If you have already installed labels widget then continue to step 2.
if not then install it.

Add it to blogger

1. Go To Blogger Dashboard-> Your blog-> Layout-> Add a Gadget -> Labels.
2. Now make the settings which are shown in the screenshot below.


3. Select the Cloud from the labels display setting.
4. Uncheck the Show number of post per label.
5. save it by pressing orange button.

Step2: Select the style you want then click Add to Blogger another tab will open just select your blog then click add to blog


Style 1 

Style 2
Style 3
Style 4
Style 5

Style 6 

Style 7

Style 8 

Style 9 

I will be updating this post whenever i found another design, so please subscribe to this post for you to be inform of new desings.
Thank you!

Website/Blog Ki Traffic Kaise Badhaye?

Apne blog website ki traffic kaise badhaye or visitors ka dil kaise jite. Aaj is post me main website blog par traffic kaise badhaye ke bare me batane wala hu. Waise to duniya me lakho logo ne blog bana rakhe hai magar wo sabhi blogging me success nahi ho pate hai. Iske kafi reasons ho sakte hai. Jaise blog par traffic na hona, Search engine me show na hona, Sath hi adsense approve na ho pana. Kuch bhi ho agar aap blogging me success hona chahte or apne site par traffic badhana chahte hai to ye post last tak read kare.

Drive-blog-traffic


Actually, iska sabse bad reason hota hai ki log blog ko puri trah bana bhi nahi pate hai. Usse pahale hi adsense ke liye apply kar dete hai. Jab unke blog ko adsense check karta hai to blog sahi na hone ki wajh se blog ko reject kar diya jata hai.
Ab aap bhi janna chahte honge ki adsense ke liye blog ko complete kaise kiya jata hai. Agar janna chahte hai to is post ko dhyan se padhe.
Agar aap adsense ke bare me nahi jate hai to ye post Google Adsens Kya Hai? padhe. Is post me aapko adsense ki puri jankari mil jayegi.
Ab main aapko blog par traffic badhane ke bare me kuch tips or tricks bata raha hai. Agar aap apni site par traffic badhana chahte hai to aapko ye tips follow karne hai.

Website Blog Par Traffic Kaise Badhaye

Yaha main aapko wo sab karne ke liye kah raha hai jise karne se aapke blog par traffic increase ho jayega.

1. Fast Loading Template Use Kare:

Ye bat humesha yad rakhe aapka blog fast open ho. Agar aapka blog 3-4 second se jyada time me open hota hai to users aapke blog ko ignore kar sakte hai.
Isliye agar aap chahte hai ki aapke blog par jyada users aaye to apni site ko humesha fast open hone wala banaye. Iske liye koi achhi or fast template use kare.

2. Blog Post Me Social Share Button Add Kare:

Aapke blog ki template aesi honi chahiye jisme aapke blog ki post me social share button add karne ka option ho. Isse koi bhi user aapki blog post ko chahe to apne share kar sakta hai.
Jisse aapki post ke bare me jyada users ko pata chal paye. Agar aap apni blog post me social share button add karna chahte hai niche wali post padhe.

3. Blog Post Title Achha Likhe:

Website blog par traffic badhane ke liye ye sabse bada or kargar tarika hai. Kyuki jab aapki post ka title achha hoga to koi bhi aapki post padhna chahega.
Isliye blog post title ko top banaye sath hi aapke blog post ke title me minimum 60 word hone chahiye tabhi google aapki post ko jald index karega.

4. Dusre Blogs Par Comment Kare:

Aap jab bhi free rahate ho to dusre blogs par unki posts par comment kare or comment me apne blog ki URL add kare. Taki koi users aapke blog par aa sake.
Humesha apne blog ke users ko uski comment ka jawab de or uski help kare. Aesa karne se users apne friends se aapke blog ke bare me batana chahenge. Jisse aapke blog par traffic badhega.

Free Theme / Template Use Kyu Nahi Kare?

Free Theme / Template Use Kyu Nahi Kare?

Free Theme Kyu Use Nahi Kare? Free Template Kyo Use Nahi Karni Chahiye? Free Theme Use Karne Ke Fayde or Nuksan (Pros and Cons) in Hindi. Ji ha dosto is post me main aapko blog me free theme / template istemal na karne ke bare me jankari dunga taki aapki aankhe sach ko dekh sake or aap jan sako ki free theme template use karne ke kya fayde or kya nuksan hai.
Ham Indian free sunate hi apne common sense ko chordkar use pane ke liye crazy jo jate hai. Jaise:- Abhi koi company 500 MB data free de to use pane ke liye turant apne personal information uske sath share karne ke liye ready ho jate hai. Isse hame keval economical loss hi nahi ho sakta hai, balki koi cyber criminal hamare name ko misuse bhi kar serious crime kar sakta hai. Recently Jio Users ke Aadhar number sahit personal informations leak ho gaye the. Isse koi bhi misuse kar sakta tha. Aap achhi tarah se janate honge, reality men koi free product deta hai to uske badle vo kuch naa kuch (jaise – personal information, permition) jarur leta hai.

Iska sabse bada example hai Truecaller, jo chand paiso me aapke mobile ka behas personal contact list ko apne server par save kar leta hai aur puri duniya me public kar deta hai.
Abhi haal hi me maine ek client ke mobile number ko truecaller website par check kiya to main jan kar hairan rah gaya ki us Client ka Name, Full Address, Full Picture, Email show kar raha tha. Yeh comapanies sidhetaur par privacy policy ke sath khilwad kar rahi hai.

Yeh baat rahi hamare personal life ki jahan ham koi earning nahi karte hai tab bhi hamare personal information ko istarah ki companies pane ke liye khub jor lagati hai.

Lekin socho? Hamare blogging life me kya hota hoga ? jahan 90% hindi bloggers free themes or free templates use karte hai. Matalab sidhe taur par ham apne blog ka full control kisi dusre person ke hatho me de dete hai.
WordPress platform ho ya fir google blogspot blogger platform dono par log blogging karte hai or internet par lakho free theme or templates mil jayegi. I sure bahut se theme providers good themes provide nahi karte or users ke sath dhoka karte hai.
Because is tarah ki themes / template me malicious code hote hai, jo regularly blog se related information jaise subscriber email id, username, password etc send karta hai, jo theme developer ke sever par save ho jata hai.
Ha, sabhi free themes free templates me malicious code nahi hote, par vo SEO Friendly & Fast bhi nahi hote. Matalab is tarah ki free theme keval promotion ke liye develop kiye jate hai.
Isme SEO ka hard code Schema.org tag ko implement nahi kiya jata hai. Jiske karan SEO Optimized post hone ke bad bhi Search Engine Google blog par traffic send nahi karta hai.
Isliye Free Theme use nahi karana chahiye, aage main iske piche ke kai reasons ko points me bata raha hun.

Free Theme Use Karne Ke Fayde or Nuksan (Pros and Cons)

Free theme or template use karne ka fayda sirf itna hai ki aapko uske liye pay nahi karna padta. Free theme use karne ke nuksan is prakar hai. Main aya wordpress theme or blogspot blogger template dono ki bat kar raha hu.
1. SEO Enabled and Clean Code Na Hona
Free themes me ki gai coding clean nahi hoti hai, jisse theme loading ke samay kai unusefull HTTP requests create karta hai, jo blog ko slow kar deta hai. Jisse sabse big bad impact Mobile User Experience par padta hai.
Isko lekar Google ne kuch mahine pahle hi clear kar diya tha, jo Mobile Users ka khyal nahi rakhega, uske blog ki ranking ko down kar diya jayega.
Aur vahi SEO Code Skima.org ke tags free theme me nahi hone ke karan blog ke desktop version par bhi traffic behad kam milate hai.
2. Data Stealing
Bad intension vale developer, jise hacker kahte hai, ve keval theme isliye develop karte hai ki big money earn kar sake.
Iske liye ve theme me malicious code ko hide tarike se implement karte hai, jo anonymously blog se related data ko send karta hai, jo hacker ke server par save ho jata hai.
Hacker un data ko marketing companies ko sell kar big money earn karta hai. Yahi karan hota hai ki hamare mobile inbox ya mail inbox me aise message mil jate hai, jiska hamane kabhi subscription liya hi nahi.
Kya aap jante hai is tarah ke khel me hamare email id ko kitane bar sell kiya jata hai, ye naa to aap bata sakte hai aur naa hi main. Tab to jahir si baat hai hamara email id kiske-kiske pas maujud hai, vo bhi nahi jaan sakte hai.
Is tarah ki theme ko nulled aur cracked theme kaha jata hai, ye aisa isliye kaha jata hai ki hackers sabse popular theme jaise Newspaper theme ki original copy me apne spying code install kar dete hai aur use free me offer karte hai.
Aur koi bhi new blogger bina kuch jaane khushi-khushi install kar leta hai aur anjane me hacker ko daily free data dene vala agent ban jata hai.
3. Unsafe Future
Theme me malicious code hone ke karan blog ka pura control (blog ka future) hackers ke hatho chala jata hai. jise vo kabhi hack kar sakta hai. lekin vo tab tak nahi karta hai, jabtak blog popular ho na jaye.
4. Redirecting
Is tarah ke malicious code aggressive hacker implement karte hai, jo theme install hone ke pahle din se hi blog ki traffic ko apne partner website par redirect kar dete hai.
Is tarah ki coding bade intelligent tarike se ready kiya jata hai, jo har samay infected blog ki traffic ko redirect nahi karta hai, balki jab traffic jyada hota hai. yani is problem ko asani se pakda bhi nahi jaa sakta hai.
Isi tarah vo kai infected blogs se traffic ko redirect kar apne partner websites par send karta hai. Jiske vo money earn karte hai.
Iske alava vo apne hacking website par send kar sakta hai, jahan greedy offers dekar aapke blog ke users ko apne jaal me fansane ki koshish kar sakte hai.
5. Waste of Money and Time
In last, infected free theme ke karan blog par achhi traffic nahi milata hai, jisse money earn karne ke bajaya hosting aur domain ke liye spent money aur time waste ho jate hai.
6. No Regular SEO Updates
Free Theme keval promotion ya specific object ko pura karane ke liye banaya jata hai. Isliye Regular SEO updates milane ka chance hi nahi banata hai. Jabki Google every 6 months SEO changes karta hai.
Jiske anusar jo Blog ke changes kar leta hai, uski traffic stable bani rahti hai, jabki free theme vale blog ki traffic down ho jati hai.

In Last Words,

Big Mango Tree pane ki chah rakhne se pahle good quality ki seed, nutrition products use karana padta hai. Isi tarah successful blog banane ke liye good quality ki theme ki jarurat hoti hai. Uske bad hi aap pakke mango ki dher ki tarah rupees ke dher kama sakte hai.

Best Search engine optimization tips (Updated for 2017)

A detailed and easy to follow SEO for beginners tutorial. This tutorial shows you how to SEO your blog post for search engines.
If you want your blog posts to be ranked higher in search engines such as Google and Yahoo, it’s important that they be properly optimized. In this SEO for beginners tutorial, I’ll show you the steps you can take to be sure your blog posts are search engine optimized.

SEO for Beginners

A search engine optimized (SEO) blog post means a potential for more traffic to your blog. If you make money with your blog, it can also mean an increase in your income.
By following these blogging tips, you will increase your chances of being ranked higher in search engines.
Helpful posts for getting more blog traffic:
Here are the steps we’ll be taking to SEO your blog post.
  1. Install a SEO plugin.
  2. Determine your keywords.
  3. Use keywords in your post.
  4. Use H2 (Heading 2) tags.
  5. Give your images a title and alt text.
  6. Interlink your content.
  7. Check your permalink.   

Step 1. Install A SEO Plugin

You can create a search engine optimized blog post without using an SEO plugin. I, however, find SEO plugins to be very beneficial in assuring that not only my blog posts but my entire website is search engine optimized.
I use and love the Yoast SEO plugin for my SEO needs. To install this plugin, in your wp-admin, go to Plugins > Add New. Next, search for, install, and active the “Yoast SEO” plugin.
Yoast ceo

Step 2. Determine Your Keywords

Before you begin writing your blog post, you need to determine what your keyword or phrase will be.
I use the Google Keyword Planner to do my keyword research. You will need to have an AdWords account to use the keyword planner. Don’t worry, you don’t have to pay anything.
UPDATE: Google Adwords now requires you to set up an ad campaign (and enter you billing details) if you’re new to the service. The only workaround I’ve seen for this is to create a campaign, and then pause it immediately after it’s created. Another great option for keyword research is SEMrush.
a. To research your keyword, visit the Google Keyword Planner and click on the box that says “Search for new keywords using a phrase, website, or category.”

b. Type your phrase into the first box (don’t worry about the remaining fields) and click on Get ideas.

 c. Scroll down to the Search Terms box, and make sure you’re on the Keyword ideas tab. It’ll look like this:
In this box you’ll find the following:
  • The average monthly searches for your phrase
  • The level of competition for your phrase
Below that you’ll also notice that the keyword planner has provided additional keyword suggestions based on your phrase.
The average monthly searches and competition level is provided for those keywords as well.
Keep in mind that the competition column isn’t showing you the competition of other people writing about this topic. Competition refers to the people who are paying to have their ad show up when this word or phrase is used. Since I’m not paying for an ad, I don’t pay attention to this column.
 d. Using the phrase “make money blogging,” I received the following results:

e. Using the information provided, I can decide to keep my phrase, or I may even decide to go for one of the suggestions instead.
You don’t want to go for a keyword that has really low average monthly searches because you won’t get much traffic that way. You also don’t want to use a word or phrase that has very high average monthly searches because there’s a good chance you won’t rank at all for that keyword).
f. Another tip for choosing your keyword phrase is to use what are called long tail keywords.
Long tail keywords consist of 3-4 keywords that are specific to what you’re writing about.
Long tail keywords are searched for less, so there isn’t as much competition for them.
Less competition means having a better chance of being found in search engines.
For example, you are more likely to be found using the long tail keyword phrase “make money blogging” as opposed to using a keyword phrase like “make money.”
With a phrase like “make money,” since there are so many other long-standing sites that have already ranked for that keyword phrase, you would most likely never be found in search engines using that phrase.

Step 3. Use Keywords in Your Post

Before we get into this, I want first to say that when using your keywords, do not force your keywords into your content to the point that your writing sounds unnatural.
Okay, moving on.
a). Post Title
I know that it’s not always ideal to include your keywords in your post title because sometimes it just doesn’t sound natural, or it isn’t catchy enough.
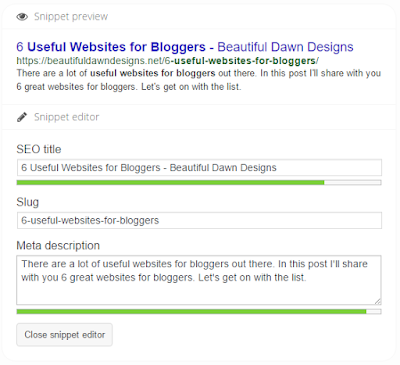
What I typically like to do is use my “catchy” title for my blog post title, and use my SEO friendly title in the SEO title section of my Yoast SEO plugin (you’ll see an example of where to put your “SEO title” in the image below).
That way, my readers see the “catchy” title, and search engines see the keyword optimized title.
b). Meta Description
When it comes to the meta description, I always include my keywords.
Your meta description should be a short description of your post, and it should always include your keywords.
I try to keep my meta description around 150 characters. If you use the Yoast SEO plugin, it will let you know when you have too many characters.
Here’s an example of an SEO title and meta description using the Yoast SEO plugin:


c). Throughout Your Post
Try to use your keywords a few times throughout your post. Remember, you always want your writing to sound natural, so don’t force it.
I try to use my keyword phrase in the first 200 characters of my post, and then again in the last 200 characters. I also try to include them in the post where it sounds natural. The Yoast SEO plugin will let you know if you’ve used your keyword too much, or too little.
I may also use my keywords in H2 tags. We’ll talk about those later.

Step 4. Use H2 (Heading 2) Tags

Headings aren’t just a pretty way to break up your content. Headings tell search engines what your content is about.
In WordPress, there are six headings (H1-H6) available.


When I use headings in my blog posts, I typically use H2 tags. Here’s why:
a. The H1 tag is for your post title only. You should not be using H1 tags within your blog post.
b. Think of the H2 tag as a subheading of the H1 tag. Once search engine crawlers find your H1 tag, they will then begin looking for all of the H2 tags.
Next, they will look for the H3 tags, and so on and so forth. As I said, I usually only use H2 tags in my posts.
c. The final reason I use H2 tags is simply because Google like’s H2 tags.
If possible, I’ll include my keywords in an H2 tag.

Step 5. Give Your Images A Title and Alt Text

When you upload an image to your post (and you should be) make sure you name your image before you upload it to WordPress.
Please do not upload an image titled DC_00346. It’s not good for SEO. Give your image a descriptive name when you’re saving it to your computer. Also, when you’re uploading your image to WordPress, you want to make sure you give your image a title and alt text.


The reason you do this is that search engines don’t know what your image is. You have to tell them.
Here’s what I do to my images:
When I upload an image to my post, I place a title for the image in the title box (use your keywords), and I put a short description in the alt text box (use your keywords).
I like to make my alt text a tiny bit more descriptive than my title, but you can put the same information for both.
For more tips on title and alt text, check out my post How to Optimize Your Images for SEO.

Step 6. Interlink Your Content

Interlinking involves linking content in your blog post from within your site.
You should be interlinking your content because (1) Interlinking is good for SEO and (2) Interlinking is an excellent way to get eyes on your older posts.
How to Interlink
When writing your blog post, if you have any relevant links from past blog posts, go ahead and place those links in your post.
For example, you can say something like, “For more blogging tips be sure to check out my post 6 Things That Should Be In Every Blog Post.”
I interlink on every one of my posts.
I do this by linking to related content within the post, and by placing related posts at the end of my post (you can see an example of how I interlink at the bottom of this post).
Placing related posts at the end of your post is similar to using one of those “related posts” plugins, but better. It’s better because:
  1. It’s good for SEO. I’ve heard countless times that those related posts plugins can negatively affect your search engine ranking.
  2. You control the content. If there’s a post you want to promote, you can bring more attention to it by interlinking it at the bottom of your post.

Step 7. Check Your Permalink

Before you publish your post, make sure your permalink is optimized as well.
A permalink is a permanent link to your blog post or page.
Ideally, you want your permalink to be simple (not too long), free of stop words (such as “the,” or “is”) and include your keywords.
If you already have a post published, do not change the permalink.
If you were to change the permalink on a published post, anytime someone visits the post using the old link, they would be sent to a 404 error page, and you don’t want that.
If you ever decide to change a permalink on a published post, make sure set up a 301 redirect from the old link to the new link. A plugin that can help you do this is the Simple 301 Redirects plugin.

Free Printable Download

To help you craft a search engine optimized blog post, I’ve created The Perfect Blog Post Planner printable for you to download. No sign up is required. Just click the download link below to access the free printable.
I know this is a lot of information to take in. Just take it one step at a time. Once you get the hang of it, writing SEO friendly blog posts will come naturally.
If you have any questions about this post, leave them in the comments.
Follow me on Pinterest for more blogging tips

Fonts Download for pc. 8 Free Party Fonts | Font Series


It’s time for another font roundup. This time I’m sharing a collection of 8 free party fonts. These fonts would be perfect to use for your party invitations, printables, and other fun graphics.
For more fonts, make sure you check out my font collection. Most of the fonts in this collection can be downloaded free of charge.
Scroll down to find download links for the free party fonts.
This post contains affiliate links. For more information, see my disclosure here.
Most of the fonts listed here are for your personal use only. Make sure you purchase the commercial license if you want to use them for your commercial projects. Be sure to read the information for each font for more details.

8 Free Party Fonts

  1. Congrats Script
  2. KG A Little Swag
  3. Cupcake Party
  4. BubbleGum
  5. Sketch Block
  6. KG Defying Gravity
  7. Budmo
  8. Happy Camper

REQUEST HERE

Blogger Tips and TricksLatest Tips And TricksBlogger Tricks

Popular Posts